Showing posts with label embossing. Show all posts

Thursday, 31 October 2013

Coming of Age

Hi Everyone.............................I just want to say thank you to you all for continuing to follow  me in my little crafty corner and for leaving such kind comments. They are really appreciated. 

Below is a canvas that I made for a friends daughter's 21st Birthday and for my first DT piece at Craft Room Challenge. I just gave you a sneaky peek the other day, promising I would pop back with the 'How To' and here it is.  

The Completed Canvas

I did take a photo of the embossed centre piece but it was rather fuzzy so I have not posted it. The card was brown and I ran it through my Bigshot using Tim Holtz Embossing die. I inked with walnut stain DI to age it and then distressed the edges with my  TH Distressing tool. I took some treasured Gold Gilding wax and highlighted some of the emboss words like Blanchard and Paris  

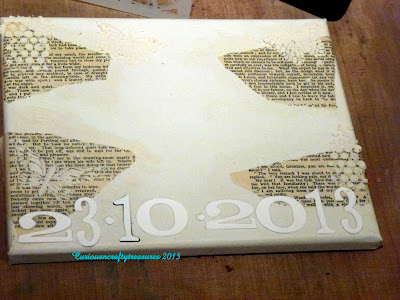
The canvas is  9" by 12" and was already prepared so I adhered some torn book pages, adhering them with Glue n Seal.  Once dry I took Tim's new Bubble Stencil and a CW Butterfly stencil, covering them  with texture paste.

The numbers are from Tim Holtz  Sizzix Wordplay die and I adhered two together to give a more raised effect that you can view later :-)


A closer look  at the numbers which I adhered with Glue n seal

Once dry I took Distress paint in Broken China, misting with water as I just wanted a wash, enabling the torn papers etc to be visible. 

Once dry I took Vintage Photo and  edged the canvas to give definition, particularly to the stencilled areas. I also applied Treasure Gold Gilding wax in Sapphire, Renaissance and White Fire, creating more definition. 

Distress inks were used to stencil Tim Holtz Dot fade on the background and also CW Art is  stencil 


Alcohol Ink was applied to the metal Ideaology plate and  an old key from my stash. 

I also used Glossy Accents in the centre of the plate over the stamped image.


I love the facial images and sentiments in the TH Stampers Anonymous Classic Favourites set
 ( SCF005) I swiped with Distress Ink and then used Distress Markers on the lips and eyes


The little Butterfly was in my stash and added further dimension along with dome Adage tickets :-)

The recipient was absolutely thrilled, which makes it all so worthwhile.


This week at Simon Says Stamp Monday Challenge it is 'Anything Goes' where I would like to enter this project.  

Thanks for dropping in

CRafty Hugs xx

post signature

Tuesday, 29 October 2013

Stencils/Masks at Craft Room Challenge

Happy Tuesday everyone.......a warm welcome to new  and old followers.  Today I am sharing a sneak peek of my first project as a DT member at Craft Room Challenge. I can't tell you how thrilled I am :-)


This fortnight Esther is the challenge host and our sponsor is Stamp Addicts. The lucky challenge winner will receive a gift voucher from Stamp Addicts to spend in their store.  

You can view the whole project  over at Craft Room Challenge Blog by clicking HERE. 

You will also be able to view the other inspiring makes of my DT Roomies.

I shall post the 'How to'  and recipe for this project later this week.

Take care and thank you for visiting.

Crafty Hugs xx


post signature

Monday, 19 August 2013

Book of Secrets and a Tag Book

Hi everyone and a huge and warm welcome to you all, particularly my new followers. I am thrilled to have you join me here in my little crafty corner. 

As part of my birthday in May I linked up to Andy Skinner's Book of Secrets Workshop. Due to circumstances I was unable to start it off with everyone else, but managed to catch up on my return to Scotland. I have always been in awe of Andy's techniques and I thoroughly enjoyed making the Book of Secrets below. I learned so much about painting techniques  and decided to make a little Tag Book with Quotes to go inside my 'Secret' drawer. When the Tag Book was finished  the two combined projects were perfect for my  DH's birthday.


Below is my little tag book, which I made by painting some tags with black paint, then once the tags were  dry I ran them through my big shot using a Tri Boss embossing folder, which was gifted to me by the lovely Tracy Evans of Craft Addicts Blog. I then used the dry brushing technique on the tags, giving them an aged look.

Various TH stamp quotes were used on the pages.


The back of the tag book


I attached the tag pages by making some mountain and valley folds, placing the tag pages within them so that they would open just like a little book. I then covered the fold with a TH paper from my stash.

Some Ideaology embellishments were attached along with some  stamped cotton ribbon that I had received  from my lovely blog friend, Lynne Moncrieff of Adorn.


To make pages of my book I used textured paste , which I painted and then coloured with a  thin wash of paint.


I would like to enter my Tag Book in the following challenge

Our Creative Corner, where the challenge is 'Words, Words, Words'.
Cheerful Stamp Pad, which is 'Your Choice'
Make It Monday, which is always 'Anything Goes'
Challenges for Everybody, which is also Anything Goes

Have a fabulous week and I will catch up with you all soon xx

post signature

Saturday, 16 March 2013

My Take on Tim's March Tag of 2013

Hello Everyone ...... I  so love the weekend as I can spend longer in my craft room and get all inky.....which I have certainly done today!!!

 I have a few projects  that are ready to complete and here is my take on Tim's March Tag of 2013. If you would like to join in you can find Tim's recipe for his March Tag HERE

I had some of Tim's ingredients  but not all of them..............so I  had a good look at my stash to see what I could create my tag with :-)

You can see the finished tag below...then I have provided photographs of what I did when improvising. 


Below is a picture of some items that I used. 


I followed Tim's recipe but as I did not have the background paper I used a substitute from  Tim Holtz 'Crowded Attic' Paper Stash.

I had the tinsel but as I did not have the rabbit die cut I adhered the ranger wonder tape at the bottom of my tag, imagining it to be the grass.........isn't imagination such a wonderful thing ......................now I am creating x


  Tinsel now adhered, as seen below, and given the treatment as in Tim's recipe


I decided that although I had the styled labels die I would use Tim Holtz New Sizzix Oval die, as I  imagined it as an Easter egg on my tag !!!  I  embossed it first  and then inked it with Salty Ocean Distress Ink, highlighting areas with gilding wax in blue and gold, then it was edged in Vintage Photo.  ( I don't know the name of the die but it is a Sizzix one.....sorry )


I placed the Sizzix Picket Fence die cut over the grass, blending Gathered Twigs DI and the gilding wax. 
( it was also adhered with Ranger Wonder Tape)

I must have used  all of my ideaology foliage so took some florals from Sizzix Tattered Flower Garland die and painted them with Tim Holtz Distress paint in Rusty Hinge and Chipped Sapphire. I placed some Ranger Stickles in 'Icicle' on the flowers, blending them in with that area of my tag, which was lovely and sparkly.


As it's March and I did not have a rabbit stamp  I used the Hare stamp from 
Stampers Anonymous Spring Sprung set ( CMS084).
He was coloured with a water brush dipped in DI placed on my craft sheet. I used an antique linen and vintage photo mix for the hare's body and a few layers of Salty Ocean DI on his jacket. I dried each layer before adding another to create depth of colour.
The cravat is  painted with a mix of DI Fired Brick and a Barn Door Distress Marker


The vintage Ribbon was smooshed in Salty Ocean DI, which was  well spritzed  with water on my craft mat, then heat dried.


I am off now to link my tag on Tim Holtz blog,  once again you can find it HERE

Have a fabulous weekend and I look forward to  catching up with you all.

Crafty Hugs
post signature

Sunday, 20 January 2013

Tim's 12 Tags of 2013- January !

Hi Everyone......so good to have you drop in.  Having only started blogging last March I missed out on completing Tim's tags of 2012. I also missed out on meeting deadlines of others due to holidays, however, this year, I am going  participate and  make the complete set. : )

Tim posts his tag of the month on his blog  HERE, if you would like to play along.

Out of respect for Tim I will only discuss  the recipe where I have used an alternative technique or improvised to create January's tag.

On the tag below I used Tim's Scribble Stain Distress technique on the tag, which you can find on page 34  of Tim's first book, Compendium of Curiosities.

Prior to embossing,  I used Peacock Feathers and Antique Linen DI's with Vintage Photo Distress Ink.

 I then blended some DI's ( Vintage Photo and Stormy Sky)  over the top to make the raised areas pop !

This is the first time I have used this SSD technique and I so love the outcome/colours.............. Don't you just hate having to cover some backgrounds ??


Below is the finished Tag.
I used Tim's rubber stamp on acetate to create the film strip and as I did not have any ribbon reel or  the vial labels.  I just used  one of  Tim's stamp's from  another collection, distressing the edge with the paper distresser and blending with Vintage Photo DI


I so love this tag as I particularly like this  grungy style.


Tim's sentiment below is so true......sometimes it's just to easy to remain in the same routine and we need a goal, challenge or dream to focus on. 


Isn't that blue/green of the Peacock Feathers DI just stunning !!


Here is my tag on another background as I could not quite make my mind up as to which background I preferred. 


As I did not have the stamp or Distress Stain that Tim used for the ribbon, I applied  another of his stamps, 
(TH Collection - Captured Moments - CMS 037) on card as  demonstrated,  then,  I applied Weathered Wood  DI on to my craft sheet and spritzed it with water, smooshing my ribbon in it. I did this a few times, drying it in between until  I was satisfied with the outcome. The ribbon was crinkly so I just ironed it to straighten it, enabling the stamping to be seen.


Thank you  for visiting and I look forward to catching up with you all soon. 

If you leave a compliment to let me know of your visit I will always try and get back to you,  it's always nice to see what you have been creating too as we all inspire one another.

Crafty Hugs

post signature

Thursday, 17 January 2013

Dreaming of Times Past, Present & Future

Hi Everyone and a welcome to my new followers.  x

What a surprise when I came online this morning and saw I had some more followers........will drop by on Friday night/Saturday morning as I am not around until then, which is why this post is not a long one.
( okay..not too long )

I was also thrilled to have been picked once again in the Top 3 over at  the Fashionable Stamping Challenge.

Well.to my post...two of my workmates had Special Birthday's and below is the card I made for a 50th Birthday. I love these images from TH Stampers Anonymous Classic Favourites SCF005.

The main image is that of someone day dreaming or wistful............most certainly very beautiful.

The card is 8" by 8 ", but not an easel.   To start I inked the  corner stamps with embossing ink, adding copper embossing powder then heat setting.   No matter how many times I have completed this process I love 'the magic' of the powder changing to a lovely metallic finish.

I then took my favourite Distress Ink....Vintage Photo and edged all around the card, blending in about about 1.5"  as I planned to cover the centre with a piece of recycled cardboard, which was in my parcel from the Funkie Junkie Boutique. ( Thank You Linda)  To give definition to the edges of the card I re-inked with vintage photo.

The cardboard was inked with Dried marigold and Vintage Photo, giving lovely warmth to the background. 

The images were stamped in Ranger Archival Ink- Coffee. Distress markers were used to highlight the eyes and lips, then the whole image was blended with a combination of  Distress Inks - Vintage Photo, Dried Marigold  and Stormy Sky. Once I was satisfied with blending I then swiped the Stormy Sky and Vintage Photo around the edges, ensuring removal of a lighter edge. This makes the image pop. All the images were matted on to cardstock, which was also edged with DI's.


Lace was adhered to the cardboard using Ranger wonder tape and with the additions of some TH Ideaology and a dragonfly from my stash ( have had these  dragonfly's for many, many  years and I just love them :), which is why I bought so many !!! )


The sentiment is so true....................so keep on playing at whatever takes your fancy. 

Over at Frilly & Funkie the challenge is Follow Your Muse and  I have to say I found these stamps very inspiring.  Simon Says Stamp and Show they are looking for projects with Love/Lace.  This card was made with love and care and also has  a piece of vintage lace.

The Sunday Stampers Challenge this week  is Dream................so I am off to participate.....................why don't you join me??

Won't be able to catch up  with you until Friday/Saturday..................but for those who leave a comment I shall definitely return the compliment.

Have fun xx 
post signature

Sunday, 14 October 2012

Autumnal Shades with Steampunk and Metal Twist

Welcome to followers old and new. I really do appreciate your visits to my blog and the inspiration that I find when I return the compliment. Today I was in a Steampunk mood and having viewed Anita Houston's Saturday  StepXStep on faux enamelling I decided to give it a try, using it as a background piece. You can find the technique here.

I used rusty hinge and walnut stain DI's over Tim's riveted embossing folder.


Over at Frilly and Funkie's blog the challenge is 'A Different kind of Tag'. Here I have made a  Steampunk Workmens Time Book using  two tag's.  I used  Oxford Impressions 'Steampunk Works'  for all images in this project. 


Once I completed the book I then took Tim's distressing tool and tore the edges of the book, which I distressed in Vintage Photo DI. ( OOps....forgot to take a photo of finished book, however,  you can view it in the last photograph)


Isn't this Oxford Impressions clockwork bird so cute :) I just had to give him a hat with a rusty top. His wing is a bit rusty too.

You can also see some  stamped cogs in the corner, which were stamped in Archival Ink


The words are also from the OI STamp Set and after stamping I heat embossed them, adding more texture.

The addition of some of Tim's Idea-ology pieces and a metal watch, coupled with some rusting completed the look. As always please let me know you have visited and I will do my best to return the compliment.

I plan to enter this piece in the following challenges :


post signature