Showing posts with label Paperartsy. Show all posts

Friday, 22 February 2019

Creative Card Making Post over at A Vintage Journey Challenge Blog

Hi everyone and a huge warm welcome to my new followers x It's always lovely to have you visit and leave a comment, enabling me to get back to you x 
Today I am sharing a Creative Card Making Post over at A Vintage Journey. To view the step by step details please click HERE

Below is a little sneaky peek of my 8x8 inch card:
At this point I was considering what my final layout would look like (by shuffling everything around) and of any additional embellishments I could incorporate x

Crafty Hugs & Best Wishes

post signature

Wednesday, 1 November 2017

Let's Get Rusting

Hi everyone ...............I cannot believe that 2 months have passed since my last post.....but then again maybe I can!!! I have made some cards for special anniversaries but creating for fun has not been easy as Mr Mojo decided to go AWOL !!!!! Think he may have been annoyed as DH and I have been rather busy with household maintenance/de-cluttering etc. I also cleaned my craft room, which took me a week as I labelled everything in clear plastic boxes...................!!!!The last time I cleaned the craft room I spent ages looking for things...so this time I should be able to locate items easier!!

Last night is the first time in ages that I thoroughly enjoyed playing/creating in my craft room..It was so nice to play with Seth Apter Stamps and incorporate some rusting. A recent post over at PaperArtsy reminded me how much I love to rust items and it had been some time since I used my rusting powder. 
And Voila !!!!
 Recipe:
Many moons ago I watched a PaperArtsy video where Leandra used a brayer and Fresco paints to create a really nice background. I then took some Black Acrylic Ink and allowed it to drip from the top of the card. Some Black Soot DI was used to tone everything down and highlight the edges of the background. Seth's stamps were all stamped in Archival Ink using a stamping platform and then fussy cut. I die cut a small circle out of black card, took a couple of Idea-ology gears and applied acrylic then rusting powder plus  a spray of vinegar............scrumptious rust !!!!  I then applied some acrylic to various areas of the background/stamped image and again applied the rusting powder and vinegar.

Having been inspired with all the rusty elements shown over at  the PaperArtsy  blog this fortnight I would like to link my make to their Rustification challenge. Why don't you join in by clicking HERE


Thank You so much for dropping in and for leaving me a comment......................I am away for a few days but hope to be posting again soon..after all it's coming up to that busy time of year when Mr Claus will be visiting.

Huge hugs xxxxx Happy Crafting
post signature

Tuesday, 13 August 2013

Birthday tag

Hi Everyone...................apologies for taking so long to get back to you all x I am now back at work having taken a couple of month's special leave to care for my husband, whom many of you know had a bad accident in the middle of May. He has made a remarkable recovery and I am so proud of him. 

Below is a tag that I made for my dear blog friend Anne, whom you know as Redanne. 

Like many of you I really enjoy making tags and used the Lynne Perella stamp set as the focal point.

Various Tim Holtz Stampers Anonymous stamps were used to create the background of the tag, coupled with the  TH damask stamp  and some  Kraft card.


The flower was layered and a pearl adhered in the centre along with some lace trimming. 

Various Distress inks were blended to create an aged look.

I also added some muslin behind the stamped image above and some Treasured Gold on the metal embellishment.
The cotton at the top of the tag was stamped with a TH Happy Birthday sentiment and a metal key attached.
I know that Anne loved her tag and like all of us will treasure it.
I am now off to catch up with as many of my lovely followers/fellow crafters as I can and will be back soon with another post.

Take care and crafty hugs

xxxxx


post signature

Sunday, 14 July 2013

Dreaming of Wings


Sunday once again and this week has  gone too quickly for sure !!!  I have managed  to find some time to craft  this week, as this is such a busy time for birthdays and other celebrations, but  I do apologise for not returning  so many visits during the last 2 weeks. I will however, certainly drop by your blog between today and tomorrow x.

Below is a tag hanging that I made using stamps from Paper Artsy, ink and the dog range. They stamp so beautifully with gorgeous clear images.


First of all I embossed the tag, which is a size 10 manila tag from Ranger, using a  Sizzix TH embossing folder.  I used various shades of Distress inks, which I then spritzed and flicked with water. 

I decided to layer some stamps over the tag and just randomly stamped text and a bee from Tim's Stampers Anonymous range.

Some Paperartsy Grunge Paste was applied through a Dylusions stencil and once dried blended with Treasure Gold wax in White Fire and Sapphire. Some of the embossing was also treated with the wax.

The dragonfly, which was originally silver, has been in my stash for years and I recently came across them when searching for another item !!.  I painted the dragonfly with Adirondack Paint Dabber in Jupiter. Once dried I spritzed with gold cosmic shimmer mist and I just love the aged, almost verdigris appearance.


Some  stained  and aged cotton was placed through the tag top and a clear bead attached to complete the look.


THank You for your kind comments which are really appreciated. Off for a  wee cuppa then to catch up with you all. Have a great Sunday and enjoy the week ahead.

I am entering this project in the following challenge themes:


Crafty Hugs xx
post signature

Friday, 5 July 2013

Bloomin' Lovely

Well its hard to believe its Friday once more..........and hey what a Friday !!!!  Andy Murray is playing in the semi-final at Wimbledon today and I just cant wait !!!!!!  Up early to get organised so that my tasks are complete and I can sit and relax.............................enjoy!!!!!!

Below is a card that I made for my mum and dad's Wedding Anniversary............the colours have not shown up to well as it is a very bright, colourful project. ( need to improve my photo skills)

Distress Inks were blended and then flicked with water to distress the background and the edges were torn with TH paper distresser. I then stamped various images using the JOFY stamps, set 11, from Paper Artsy. This is the first time I have used these stamps and they are so versatile, in that you choose your own layout/design.

Over at Country View Crafts the challenge is Summer Sizzler, where I am entering this piece. Click HERE if you would like to join in the fun


The florals were coloured with various Distress Inks and Promarkers, keeping it sunny and bright.

To add further detail and depth I adhered some torn  book pages. 


Hoping to catch up with you all over the weekend and whatever you are doing.......................Have A Good One xxxx
post signature

Sunday, 23 June 2013

Dare to Dream

Good morning everyone.......................weather not very nice her at present.....I do hope that the sunshine returns soon. Almost need to put the heating on as its a bit cooler this morning. 

Today I am sharing a wall hanging that I made for my sister's  recent birthday :-)


Just a quick post as I have several things to do today. The recipe was more or less the same as the previous make. I used a paper distresser to age the edges on the corrugated card. On the cardboard I used my TH scissors to distress the edges. I also used gilding wax on the corrugated card.

I am entering this make at the following challenges:


'THank You' so much for popping in and if you have time please leave a comment. I can then return the compliment by visiting your blog. 

Crafty Hugs and have a lovely Sunday xx
post signature

Thursday, 16 May 2013

Cabinet Die Card

Hi Everyone and a huge welcome to new followers. Tonight I am posting a cabinet die  shaped card.. You will see that I have made my own background using  a variety of stamps on all the pages. The stamps that I have used are mainly from Paper Artsy, though the sentiment on the back and dots/ hexagon images throughout the pages are from Tim Holtz Stampers Anonymous Collections.


First of all I painted the whole card with Paper Artsy Fresco Finish Paint in Ice Blue then I Stamped the images with Ranger Archival Inks in Magenta Blue and Coffee.  
On the second page ( below left) I stamped the Paper Artsy stamp on some tissue paper layering it over the image below  and edging with Spiced Marmalade Distress Inks.
The main image on the right hand side is also from Paper Artsy and one of my current favourites.


On the 4th and 5th pages  I used the Paper Artsy Clockwork Birds accompanied by some cog stamps from the same set.


On the back I used a sentiment stamp from Tim Holtz Stampers Anonymous Collection.


Random stamping was added to each page before inking with Spiced Marmalade and Walnut Stain DI's

Papers were added to the front of the card using Ranger Inkessentials Glue 'n' Seal. I then blended charcoal pencils around the paper to add depth.

I am entering this card in the following challenges:


Thank You so much for visiting and if you can please leave me a comment and I will return the compliment

Crafty Hugs
post signature

Monday, 23 July 2012

'Practical' Perella Card

Hi Crafty Friends...........hope you all had a lovely weekend. The weather in the West of Scotland has not improved much, however, I am glad that  many of you are seeing more sunshine. As usual the weekend passed much to quickly and its back to work before we know it x

The card below was made for a close friends birthday. I used stamps by Lynne Perella for Paper Artsy.  Given the dimensions of the long stamp I decided to create a bookmark as part of her gift. The background of the card was blended with various DI's, namely vintage photo and rusty hinge.  I then stamped  over the background using a flourish stamp/clear embossing ink. Gold embossing powder was added and heat set, creating further dimension. The stamps were cut out and  blended with DI's. I then used a Ranger TH watercolour brush to colour the stamped images with diluted DI and love the intensity of the water colour. On the bookmark I blended embossing ink and clear embossing powder over all areas before using my heat gun to set it. ( this made the book mark a bit more resilient to wear and tear )  The bookmark was attached to the card using a small  velcro  dot, enabling it to be removed as required.  Ribbon was added to the bookmark and a  wire embellishment was added  across the smaller stamped image.

Over at the Sunday Stampers Challenge the theme this week  is 'More than Words'. This piece certainly fits the bill as there is a word, but also my friend has a lovely bookmark to use and  treasure.


A huge 'Thank You' for visiting my blog and leaving such kind comments. As always, I shall return the compliment.

Crafty Hugs  Annie x


Monday, 16 July 2012

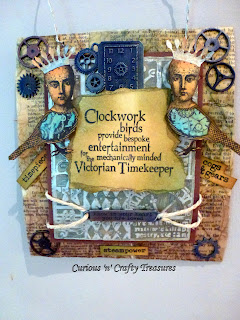
Clockwork Birds

Hi Everyone.............sharing a piece that I created for my DH's birthday. I just love the stamped images from Paper Artsy.

To make this piece I used recycled cardboard, covering it with multi- medium before covering with recycled book pages, which were blended with distress inks. Taking a piece of Metal foil, adhered to card stock, I ran it through a TH embossing folder on my Bigshot. I then covered the embossed foil in Denim and gold paint dabbers, sanding the metal foil once paint dried. The clock work birds were stamped on ultra smooth white card, cut out and then inked with distress inks and some gold paint  from the dabber was added to the crowns. The sentiment was also blended with distress inks.  a variety of metal charms/cogs were used and were altered with paint then wiped with a dry cloth. The metal tag was adhered with sticky pads and string attached. I used sticky pads to raise the metal background, birds and main sentiment, adding dimension. 

Wire was then twisted and placed through piercings, enabling this piece to be hung on a wall.

I am entering this piece in the following challenges:

Sir Stampalot Challenge - Whats Your Crafty Passion ( my passion is Distress, Vintage and Steampunk )

Many thanks to followers old and new for continuing to visit and leave comments. 

Crafty hugs

Annie x


Sunday, 27 May 2012

Alter It

Good Morning everyone. Hope you are all well and enjoying your crafty time. 

I have had these foil trays for ages and thought I would 'Re-Invent' them for this challenge. I used alcohol inks to colour the foil, however, getting in to the corners was difficult so I thought I would try the Paper Transformation Technique, inspired by Neil Walker of Neelz Expressionz ( click here for the tutorial) Its hard to believe that this was once just plain old copy paper !

  For my 'plastic existence' I cut out a piece of plastic from a milk carton, putting it through my die cut machine, and you can see the flowers below. I used inks on the flowers but then decided to use  Ranger Glue 'n' Seal, followed by a variety of  Adirondack paint dabbers, followed by Distress crackle pain in Rock Candy.  ( I was also changing the colour of a metal chain for another project )
 As you can see I used a variety of stamps designed by  Tim Holtz, Wendy Vecchi & Lynne Perella.

The large sentiment on the top piece  was designed by Chris Stern of CS Designs. I received this digital sentiment having been featured in the  Recycle, Re-Purpose & Re-Invent April Challenge . You should pop over to Chris's online store and view  her designs for yourself.  The images and sentiments are beautiful.
( As a new blogger I was thrilled to bits to be featured !!)
 I adhered some burlap around the large foil tray and added the Sizzix, TH, Word Play die cut letters, which are rusted, using rusting powder/acrylic wax from Crafty Notions. ( you also add white vinegar to the mix )
 On the bottom foiled tray I adhered  some vintage lace. The trays were then pieced together using some string.

                                       
                                         Hope you like this piece, which I had great fun creating.
I am  also  going to submit this creation to  the challenges at Inspire me Fridays- Always Anything Goes and Scrapalicious- Something Altered .

                                           Crafty Hugs as always and have a good weekend

                                                                         Annie  :)