Showing posts with label AVJ. Show all posts

Friday, 4 December 2020

Merry Christmas at A Vintage Journey

Hi everyone I hope you are well and keeping safe xx Christmas will be quite different for many of us this year as spending time with family and friends is acceptable but not recommended.  On a positive note we are informed there is light at the end of the tunnel as vaccines become available in the UK/aroud the world.

Over at A Vintage Journey this month the Creative Guides have created Artist Trading Cards for our last ever challenge. It is with great sadness that this amazing challenge blog is ending, however, due to many changes with blogger,  various platforms now available to showcase your crafty makes AVJ has seen less peeps visiting,  commenting and participating in our challenges.

Brenda has explained our ending beautifully  on the challenge blog and you can read it by clicking HERE

When AVJ started out we were creating in the style of Tim Holtz, therefore I decided to create my Merry Christmas ATC's using his products. I do apologise for the poor quality of the photographs, which appeared fine until I edited them.

Below you can view my "Farewell" ATC, again in a vintage shabby style, using lace/ribbon etc from my stash, together with Tim's Paper Dolls and leaf dies.

I have had the most amazing time being part of A Vintage Journey as a Creative Guide. I have learned so much and been inspired by my uber talented teamies/friends both past and present. (I have also been fortunate to meet with many of them too x ) So much inspiration has also been provided by  AVJ followers and entries to our challenges and although I shall miss that I have managed to catch up with quite a few peeps on Instagram. So "Farewell" to AVJ it has been a blast but I think it's the right time as with any journey we frequently change direction. 

Best wishes and thank you for all the lovely comments left over the years. I have treasured memories and I am sure I will keep in touch with my friends at AVJ x

Wishing everyone a very Merry Christmas & Happy New Year 2021

Best wishes

Annie xx


post signature

Friday, 7 June 2019

Tissue Paper is the challenge theme for June over at A Vintage Journey

Hi everyonexx As mentioned in my last post we have a new challenge theme for June over at the A Vintage Journey Blog. My lovely teamie and  dear friend Astrid is this month's challenge host and here's what she has to say about the challenge :
"There are many different ways you can incorporate tissue paper into your project - create texture by scrunching it up, stain it, paint it, wax it, stamp on it, emboss on it. You could use cheap tissue from the supermarket, recycle gift wrapping tissue, or even use old dressmaking patterns. Just remember to create in one of our preferred styles of vintage, shabby, mixed media, art journaling, industrial, timeworn or steampunk."
I have used a tissue napkin, separating the layers of tissue before adhering to the substrate with a glue medium.
 Gesso was applied to the large jumbo tag and one of Tim Holtz Idea-Ology Bookboard Frames.
The words Paris and Carte Postal, Fleur De Lys and date were stencilled using some Thats Crafty Light Texture Paste through Andy Skinner's stencil.
 Whilst the texture paste was drying I prepared my napkin, separating the tissue layers then trimming to fit.
 
 Some Decoart Timeless Chalk Paint was painted on to the Jumbo Tag and a coat of Decoart Raw Sienna was applied to the bookboard frame. Once dry Thats Crafty Crackle Glaze was applied to both substrates.
 A coat of Decoart Chalk Paint in Lace was then thinly applied to the tag and Bookboard with amazing effect.
 The tissue napkin was adhered using Ranger Glue medium and I thought that adding some torn pieces of tissue added to the aged effect I was trying to create. I love that the crackle can be seen through the tissue x
 Various Distress Inks, Vintage Photo, Bundles sage, Walnit Stain and Fired brick were gently applied over the tag and bookboard.
 Then some gilding wax on the raised stencilled areas.
Finally some charcaol was applied and blended around some of the waxed words/numbers.
Some  TH Idea-ology Paper Dolls with trasparent wings attached along with flowers  and a large butterfly from  TH Botanical Ephemera  and a chipboard quote completed the shabby vintage appeal I was trying to create.
I would like to enter this jumbo tag in to the challenge theme over at the Frilly and Funkie Blog, where the challenge is "Embellishments, Trinkets and Trims "
My embellishments are Tim's Idea-ology Paper Dolls, Botanical Ephemera, Quote chips and lace as well as some vintage ribbon at the top of the Ranger Jumbo Tag.

For even more inspiration please click HERE, which will take you over to theAVJ blog where you can see all the inspiration provided by my fellow Creative Guides xx
Thanks again for dropping in as its lovely to know you have visited and as always I will get back to you to view your crafty makes too xx

Huge hugs and Happy Crafting xx
post signature

Friday, 2 February 2018

Melt It Challenge at A Vintage Journey Challenge Blog

Hi everyone xx Hope you are all well and keeping cosy if you live in a cold climate......for those of you in sunnier climes enjoy the weather x I just can't wait for Spring to arrive xx
Today I am sharing my project created for the lovely and talented Julia Alston's challenge theme for A Vintage Journey blog, which is 'Melt It'. Here are the challenge details as described by Julia:

"This month we're asking everyone to MELT IT! Get out the UTEE (ultra thick embossing enamel), beeswax, encaustic wax, embossing powders or good old wax crayons and a heat tool and get melting to create something in a vintage; shabby; mixed media; art journalling; industrial, timeworn or steampunk style!"

Our sponsor this month is COUNTRY VIEW CRAFTS, who are giving our randomly chosen winner a £20 gift voucher to spend at their online store.....so definitely worth entering!! We, the Creative Guides, ( DT) choose three Pinworthy projects  who will receive a Pinworthy badge to display on your blog.

I had such fun with this challenge theme and decided to play with Shrink Plastic as well as my Melt Pot, which had not seen the light of day for a few years !! 
First of all a Bee Crafty MDF Art Board was covered in gesso then painted with Raw Umber by Decoart. Once dry Decoart Weathered Wood Crackle Medium was randomly applied  to the substrate as I only wanted a few areas of crackle. Once the crackle medium was dry the Art Board  was painted with Decoart Chalk Paint in Lace. My wood mounted Egyptian Stamps, which I have had for over 20 years, were used to stamp the background in  Sepia and Forget Me Not Archival Ink. Once satisfied with the stamping, which was not perfect as I was attempting to create an aged feel to my project, Vintage Photo DI was applied, creating some depth to the cracked areas.
It took me ages to find my shrink plastic, carefully hidden amongst other treasures in my stash. Once again Egyptian stamps were inked with Archival Ink in Black then  once stamped were roughly cut out to create a variegated edge. When my heat tool reduced the image size  Vintage Photo Distress Ink was applied. 
A torn piece of 300gsm card was covered in Ranger Perfect Medium, enabling the UTEE to stick to it.  My heat tool was then applied to the embossing powder on 4 occasions before stamping in to the medium whilst still warm. (nb The Egyptians stamps were also covered in the Perfect Medium before applying to the UTEE as it prevented the step from sticking) TIP - if you are not happy with the stamped image then you can just heat it up again and stamp until you are satisfied with the outcome.
Jet Black Archival Ink was applied to another of the stamps and I was pleased to see that it adhered very well on the enamelled surface. 
Then it was time to play with my Melt Pot and more UTEE powder in Gold. ( I also placed some UTEE Flex in with the powder as it makes the molten powder more flexible when it hardens...not sure if it has been discontinued but it is really beneficial, especially when trimming stamped areas with scissors or a craft knife)
First technique was to pour the molten powder in to a silicone pyramid mold. 
The second technique was to pour the molten powder on to my craft sheet and then stamp in to it with a Nefertiti stamp, which again had Perfect Medium applied to prevent it from sticking. 
Tim Holtz Idea-ology Print Books, which were a gift from my lovely blog friend, Redanne, were used to finish this piece and using my fingers I applied a coat of Decoart metallic Paint in Ice Blue, the edge of the Art Board was also given a coat of this stunning colour, which really pops against the background colours. (I have decided I must use more of my Tim Holtz gifts/stash in projects this year)

Please take  GREAT care when using a Melt Pot as the liquid is very very hot and you should always use both hands when pouring. 
For more inspiration by fellow Creative Guides Please click HERE, which will take you to the AVJ blog.

Have Fun & Happy Crafting xx
post signature

Friday, 3 February 2017

Words That Are Special Challenge at AVJ

Hi Everyone................its so hard to believe that it is February....where did January go??
Anyway its time for a new challenge over at A Vintage Journey and this month our Creative Guide,  Jennie, of Live The Dream blog is the challenge host. 
Here's what Jennie has to say about the challenge theme:

"We often use words for cardmaking, scrapbooking, journaling, layering backgrounds, stamping, collage, in mixed media work, on our tags …. In fact words are often an integral part of our design processes for many of our projects. This month show us words that are important or special to you and how you incorporate them in your vintage; shabby; mixed-media; art journaling; industrial or steampunk art."

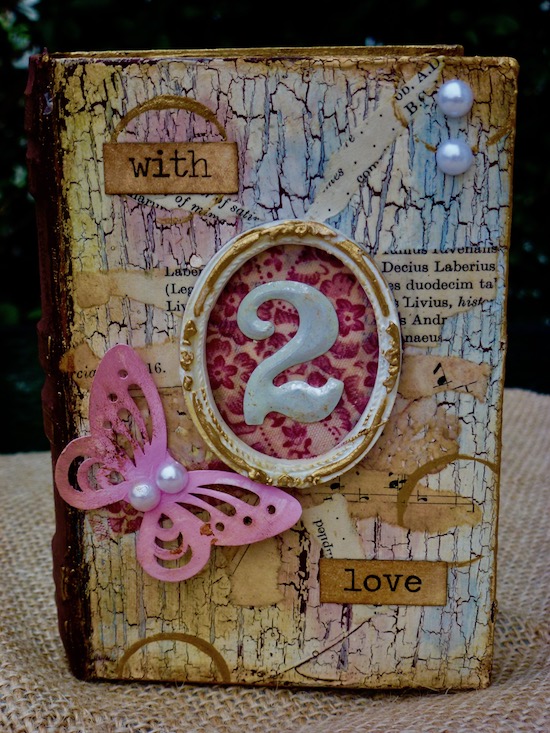
Below is an altered art piece that I have created for the challenge. I did take step - by step photographs but having just updated my pc I seem to have lost iPhoto, which I used for importing/editing and resizing etc. 

Here are the photographs of the finished item:
Decoart paints and crackle glaze were used on the background and then alcohol inks were applied and quickly wiped off with a wet wipe as they dry very quickly and I wanted to spread colour around.
Torn papers and fabric were adhered with a matte medium and some fabric applied to a frame. I then painted the number 2 with some antique linen DP, using my finger tips to apply some decoart gold metallic paint to the number and around the edges of the book. I also took the gold paint and made some random circles ageing the altered piece even more. Some Vintage Photo DI was also applied around the edges.
Below you can see a die cut heart and adage ticket, a piece of tartan ribbon and some more words. 
Hope you can join in with us for this months challenge. As always we have a sponsor and randomly chosen winner. We also have  three Pinworthy winners who have the chance to be Guest Creative Guide on the  AVJ challenge blog.

Thank you for visiting and taking the time to comment. I really appreciate it as I know how precious time can be. 
To go immediately to AVJ  blog, where the team have left even more projects to inspire you please click HERE

 Thank You for visiting and Crafty Hugs xx

post signature

Friday, 6 January 2017

Going Round In Circles at A Vintage Journey Challenge Blog

Hi everyone xx Here we are with the first challenge for A Vintage Journey in 2017 and our theme is 
"Going Round In Circles". See below for the challenge details:

Whether large or small, 2d or 3d, clock face embellishments, buttons, eyelets or created with paint pot lids, stamped, stencilled, doodled or finger painted let’s see what gets you going round in circles. This challenge theme particularly fits with the art journaling style we love to see but can also be incorporated into a vintage; shabby; mixed-media; industrial or steampunk project.

I decided to incorporate a mix of Journalling and Vintage/ Shabby Chic styles in my project, which you can see below:
 I was not sure at all where I was going but decided to cut out some circles of varying sizes as viewed below.
 As the big wheel is a circle I decided to incorporate the stamp on the large circle, which was stamped in Sepia Archival Ink then blended with Tea-Dye Distress Ink
 Some Dot stencilling applied in Black Soot DI
 Paint was applied to a small bottle cap and placed here and there on all three circles. The same paint was also applied to my Ranger scraper, but you could also use an old credit card to create some lines.
 Teesha Moore stamps were inked in Jet Black Archival and then fussy cut. The smallest circles from the SB die were coloured with Tattered Rose DI and then cut/ sprayed with water/shaped with some tools and left to dry.
 To bring in some of the vintage/Shabby appearance I wanted to create I adhered some round ribbon flowers and pearls on all three circles as seen below. You can also view the little shabby flower.
 
 An Idea-Ology Tag fitted the bill for even more circles. I also took a white pen and added some dots around the paint marks. A little butterfly was cut from old book pages and adhered to card,  edged with Black Soot DI then decorated with some pearls.
 Then it was decision time for which ribbon to apply as I thought this make would be a nice wall hanging. I also adhered some clean die cut circles on the back to give it a  more professional finish, especially if it becomes a gift (also hides my mess!!)
 A close up of the large panel, edged in Black Soot DI
 A close up of the middle panel
And the small panel. ( just spied some glue, which I should have cleaned prior to photographing....sorry about that) xx
Over at A Vintage Journey you can view more challenge themed inspirational projects created by our very talented Creative Guides. Just Click HERE
There is also a random winner chosen every month as well as the chance to be a Challenge Pinworthy/future Guest Creative Guide for 3 of the challenge entrants. 
Thank You so much for dropping in to my little corner of blog land. As always your visits are very much appreciated. 
Looking forward to seeing your entries at AVJ xxxx
post signature

Friday, 7 October 2016

Make it Spooky for A Vintage Journey October Challenge

Hi everyone...........Its that time of year again when things "Go Bump in The Night" and the lovely Anne Redfern has chosen the theme of "Make it Spooky" for this month's challenge at A Vintage Journey.
Here are Anne's own words regarding the challenge theme details:
As we approach All Hallows' Eve we want you to create a vintage, shabby, industrial, Steampunk or mixed media project to celebrate the spookiness of Halloween, don't limit yourself to black, orange and purple - just 'Make it Spooky'!!


Having recently located some of my stash of Graphic 45 papers I decided to make a Spooky Steampunk Project. For more spooky projects made by my amazing AVJ family and to join in with the challenge please click HERE


I have had this clock for quite some time so decided I would like to alter it and make something that I could use as a home decor piece. As mentioned I used papers from my Graphic 45 stash. Its tie for me to start using these gorgeous papers along with others, after all that's what they are for!!!!
The front of the paper stash used can be seen below and above you can see how I used the back of the clock as the template.
 I decided to do a bit of 3D decoupage and fussy cut some of the paper elements, edging them with my distress marker to remove the white  cut edge.

I also added Crackle Accents to the cut papers and really liked the way they appear when layered.  as seen below
Some spider web  fabric and a spider/skeleton, who is trying to escape !!!
And below another photograph of the finished project.  The skeleton hands were clasps that I purchased in a supermarket beginning with S and ending in Y's. I just removed the clips!!!
I do apologise for the way the light is catching the sign above the clock, which reads Potions & Charms. 
For more inspiration by my AVJ family Creative Guides and to view challenge details please click HERE
Thank you so much for dropping in today and I look forward to viewing your entires to the AVJ challenge. 
Take care and keep crafty xx

Friday, 5 February 2016

Industrial Style at A Vintage Journey

Hi everyone...well where on earth did January go !!!! This month the challenge theme at AVJ is "Industrial  Style"and is being hosted by the lovely Tracy Evans.

Here are the challenge details in Tracy's  own words:

"Use your foil tape, or metallic card stocks with your texture fades/embossing folders to create an Industrial creation all your own. Whether it's a background or bloom or anything, don't limit your paint color to black--The Industrial technique looks great with all colors of paints.:

So there you have it ! A fabulous challenge and some great details for you projects.

Yo can see my project below, which was a card made for a friends 65th Birthday. I am pleased to say that he loved it and is going to frame it !
First of all I cut a piece of Tim's Industrial Paper stash, distressing the edges and then mounted on to some black card, whose edges were also distressed. I followed Tim's technique for the metal foil, however, I used a  black deco art paint as I did not have Black Soot Distress Paint.

One of Tim's Found Relatives was cut and placed inside his frames. Taking one of Ti's stampers Anonymous stapes I inked it with embossing ink then white embossing powder, which really showed up on the black card.
 The word Travel below the Idea-ology arrow is from one of Tim Holtz Rub On sets.
I leo cut a piece of one of his ephemera pieces placing it just below the stamped image and slightly on the framed photo. An Idea-ology wing and some gears created further depth.

Thank You so much for visiting and I do hope you can join in with us over at AVJ. Country View Crafts, who are our regular sponsor,  have donated a £20 voucher for the challenge winner to spend at their online store. Susan's prices are very competitive and if you live in the UK they are postage Free.
WE also have three Pinworthy Badges for your sidebar if you are chosen as one of the Top 3 by the Creative Guides

To view the projects created by my uber talented teamies please click here, which will take you directly to the A Vintage Journey  Challenge Blog

As always thanks for popping in here at CCT and for leaving some much appreciated love 

Huge hugs and have fun xx

post signature

Friday, 27 June 2014

Using Every Stamp in the Set at AVJ


Hi friends..................its Friday again and time for the next challenge at A Vintage Journey. Nikki is the challenge host this fortnight and her theme is to 'Use Every Stamp In The Set' of your choice. 
This sure is a fab challenge and we just can't wait to see  your amazing entries. 

As always our sponsor is Country View Crafts and to be in line to win a gift voucher to spend in the store you must follow our Travelling Instructions ( Challenge Rules)

Below is my Design Team project, using Tim Holtz Stamper's Anonymous set 'Oddities'

I started off with black A4 cardstock and papers from Tim's Laboratorie Paper Stash, which was distressed around the edges with the distressing tool and scissors, then inked with Black Soot DI.
I also added splats using Black Soot Distress Stain directly on to the paper as well as through Tim's 'Splatters' Stencil. 
 Taking various papers from the Laboratorie Stash I ran them through the Big Shot using Tim's Sizzix Tag and Bookplates Die and Spring Greens Strip Die. The tags were blended with Black Soot DI and various techniques were applied. The tag on the left was randomly stamped in Ranger Jet Black Archival Ink using the eye stamp.The tag on the right was heat embossed using Tim's Distress Embossing Powder in Black Soot. The tag in the centre was achieved by applying Tim's Technique from  his CC3 book called Layering Stencils-Monoprint.
 Here is a picture of the Stamp Set I used :
 Thought You may like to see some close ups of the tags, which were adhered with foam tape to add dimension. I have been desperate to use my new Idea-ology purchase-----------the monacles. You can also see an Idea-ology wing too. The leaves were only adhered here and there so that I could raise the leaves again creating depth as I may frame this quirky piece.
 I just love this centre tag and its such a shame that you cannot see the depth created by the bee, leaves and hand stamps.
 This tag is the heat embossed one and as I love this eye stamp I just had to apply it under the  Idea-ology Ornate Plate.
 The paper strips within the Laboratorie Paper Stash were matted on to black cardstock and gives a neat finish to this make.  More Spring Green leaves cut from some German Script book pages received from a very close friend.
I hope I have managed to inspire you to join in this wonderful challenge theme and of course you can view more fantastic projects that my DT sisters have created  over on the AVJ Blog HERE

Over at Simon Says Stamp Monday Challenge the theme is : I oughta use this more. I should certainly use these stamps more as I love the quirky style and it was great fun to play with the Distress Embossing Powder again. 
Have fun whatever you do and enjoy wherever your creativity takes you.


post signature