Showing posts with label Tim Holtz. Show all posts

Sunday, 14 December 2014

Secret Santa @ AVJ

Hi Everyone....It's lovely to catch up with you here at my little corner of Blog Land.
As you know I am one of the Creative Guides over at A Vintage Journey Blog. I am so very proud to be part of this amazing team of uber talented crafters, many of whom I have met. We all have a love of Tim Holtz products and style in common and it's wonderful to see the diverse range of Mixed Media creations that are posted on AVJ for your inspiration/enjoyment.

This is our very first Christmas and we decided to have a Secret Santa, which meant that we received the name of another DT member, for whom we had to make a Christmas Gift/Card.

Below is my creation, which was posted to the most sweetest address I have ever heard of and is the home of  the very talented Sandy Diller, of My Crafty Life Blog :-)

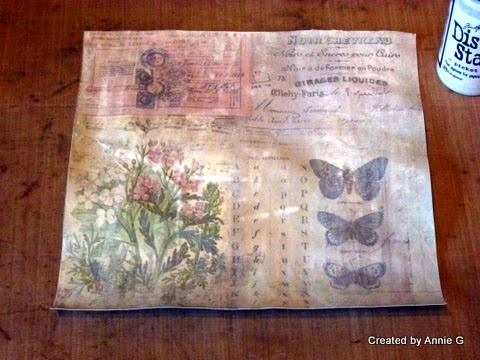
First of all I created an 8 by 8 Tri-Fold Card, which I covered with Tim Holtz Seasonal Stash Papers.
These truly are the most gorgeous papers and very sturdy. The papers were edged with Distress Ink In Vintage Photo and Walnut Distress Stain.
I had some Burlap Ribbo in my stash, which I applied to the holes punched with my WRMK Cropodile.  Some Jingle Bells were added for effect xx
One of the papers in Tim's Paper Stash has the most lovely Santa verse, which decorates the sides of the interior. The papers were again distressed and then matted on black card.
You can also see some Ice Skates, which were gifted by my mum.............if anyone would like to know whose die this is I can find out for you so please email me............button on side bar :-)
The Right hand side, once again matted on black card, having been aged with Vintage Photo DI
The main photograph is a real favourite and reminds me of the 1960's when I was a child. Many of the photographs were still printed in black and white and I loved their appeal.
There is a lovely verse on the back for Sandy and her family, wishing them the most loveliest of Christmas's. 

Then, there was the  beautiful Secret Santa gift that I received from the lovely and very talented Jennie Atkinson of
Jennie met with mum and I earlier this year and we had a lovely crafty day. She kindly shared how she makes her renowned flowers and we just laughed and chatted.....it was so nice x

Here are a couple of pictures of Jennie's make, which I am sure she will be sharing in more detail on her blog


A beautiful gift to treasure and you can never have enough candles x

If you would like to see some more of our Secret Santa Gifts then please hope over to the AVJ blog HERE

There is also a  Christmas Giveaway.................and depending on the amount of entries who comply with the rules there may be more than one !!!.............Please see details below or click HERE to go to the AVJ Blog

I would also like to take the opportunity to wish you all a Merry Christmas and a Happy New Year for 2015

Thank You so much for all your wonderful comments and support throughout the year, it really does mean a lot to me.  xx

Huge Hugs


post signature

Friday, 25 July 2014

Just Stain It @ A Vintage Journey Challenge Blog

Hi everyone and welcome to followers old and new......its great to have you visit today as there's a new challenge over at A Vintage Journey. 
The uber talented Jenny (Buttons) is our challenge host  this fortnight and she is asking that you use 'Distress Stains' on your projects to be in with a chance of winning a gift voucher from our regular sponsor Country View Crafts. 
As always, its very important that you read Jenny's challenge details followed by the Travelling Instructions.

It has been some time since I played with my Distress Stains but I really had a great time and you can see my DT project below:

 The background is a 6 by 6 paper from Tim Holtz Wallflower Paper Stash that I covered in Picket Fence Distress Stain, then tore the edges with my paper distresser tool and blended with Walnut Stain DI
 A smaller paper from the same TH stash was cut out and I took this photograph to let you see the before and after stains effect. I love the shabbiness of the large background paper when you apply the  PF DS.
 I remembered that Tim has shown us how to distress Kraft Glassine on page 26 of his CC2 book, and you can see the result below. 
 I also applied various shades of Distress Stain to some tissue tape, then, once heat dried I applied a layer of Picket Fence Distress Stain to tone the colour down a bit.
 You can see below that I decided to tear the kraft glassine and tissue tape applying them on the background paper. (To store unused tissue tape that I have coloured I stick it to some plastic or acetate for future use.)
 Metallic Distress Stain was applied to some Kraft Card as I wanted to have a brass colour to mat my top piece on to.
 The Distress Stains are also perfect for colouring ribbon and I am sure that you have seen Tim Holtz do this many times on his blog.

 A close up of the centre piece of my card.
Some Idea-ology in the form of the metal flowers, paperclip and a word band, as well as some butterflies and a postage stamp  from Tim's New Ephemera completed the look. The butterflies were coloured with Distress Markers and edged with Vintage Photo DI.

 To view even more inspirational makes by my fabulous DT sisters please click HERE

Thank you so much for dropping in and I do apologise for the number of photographs, however, I know that many of you like to see how the finished project was achieved.
Take care and I hope you can join in with our challenge.....it would be great to see you over there.

Bye for now xx
post signature

Friday, 27 June 2014

Using Every Stamp in the Set at AVJ


Hi friends..................its Friday again and time for the next challenge at A Vintage Journey. Nikki is the challenge host this fortnight and her theme is to 'Use Every Stamp In The Set' of your choice. 
This sure is a fab challenge and we just can't wait to see  your amazing entries. 

As always our sponsor is Country View Crafts and to be in line to win a gift voucher to spend in the store you must follow our Travelling Instructions ( Challenge Rules)

Below is my Design Team project, using Tim Holtz Stamper's Anonymous set 'Oddities'

I started off with black A4 cardstock and papers from Tim's Laboratorie Paper Stash, which was distressed around the edges with the distressing tool and scissors, then inked with Black Soot DI.
I also added splats using Black Soot Distress Stain directly on to the paper as well as through Tim's 'Splatters' Stencil. 
 Taking various papers from the Laboratorie Stash I ran them through the Big Shot using Tim's Sizzix Tag and Bookplates Die and Spring Greens Strip Die. The tags were blended with Black Soot DI and various techniques were applied. The tag on the left was randomly stamped in Ranger Jet Black Archival Ink using the eye stamp.The tag on the right was heat embossed using Tim's Distress Embossing Powder in Black Soot. The tag in the centre was achieved by applying Tim's Technique from  his CC3 book called Layering Stencils-Monoprint.
 Here is a picture of the Stamp Set I used :
 Thought You may like to see some close ups of the tags, which were adhered with foam tape to add dimension. I have been desperate to use my new Idea-ology purchase-----------the monacles. You can also see an Idea-ology wing too. The leaves were only adhered here and there so that I could raise the leaves again creating depth as I may frame this quirky piece.
 I just love this centre tag and its such a shame that you cannot see the depth created by the bee, leaves and hand stamps.
 This tag is the heat embossed one and as I love this eye stamp I just had to apply it under the  Idea-ology Ornate Plate.
 The paper strips within the Laboratorie Paper Stash were matted on to black cardstock and gives a neat finish to this make.  More Spring Green leaves cut from some German Script book pages received from a very close friend.
I hope I have managed to inspire you to join in this wonderful challenge theme and of course you can view more fantastic projects that my DT sisters have created  over on the AVJ Blog HERE

Over at Simon Says Stamp Monday Challenge the theme is : I oughta use this more. I should certainly use these stamps more as I love the quirky style and it was great fun to play with the Distress Embossing Powder again. 
Have fun whatever you do and enjoy wherever your creativity takes you.


post signature

Tuesday, 24 June 2014

Inspired by a Tattoo Challenge at the Craft Room

Hi Everyone.............another fortnight has passed and its time for the next Challenge at the Craft Room, hosted by the fabulous Zoe.
Zoe is fascinated with Tattoo Art and would like you to make a project inspired by a tattoo style that appeals to you. She also asks that you let us know the 'style' of  the Tattoo Art that has inspired you and there's also a little twist !! Zoe would like you to add a hand drawn element to your project ( from your own hand)

I have to say that this was a huge challenge for me and I started off with cherubs and fairies, but I was not happy with the outcome...................so I went for the Gothic Style.
My hand drawn element was the squiggles on the side of the skull. ( I should have taken the squiggles further, by adding some Zentangle designs, however, the photograph had been uploaded and edited, maybe this is something that you could  consider adding to your entry)
Stencils, Distress inks,stamps  and the pen nib are all from Tim Holtz products range. The ribbon at the top of the tag was stained with Black Soot distress ink as I did not have any black ribbon.
I have to say that I was totally amazed by the numerous meanings of a skull tattoo as I always saw them as being related to anger and mortality. Having searched online I found out that they can mean protection, strength and power as well as overcoming tough times, past life and renewal.  I now understand Zoe's attraction as many of the tattoos I have seen are the most amazing works of art.

Our sponsor this fortnight is the fabulous Tando Creative.....who are offering a prize to the randomly drawn winner of Zoe's challenge. We also have a Top 3 too :-)
For further inspiration  from my DT sisters and to see Zoe's wonderful inspiring project please click HERE

Remember to check out the pesky rules as this challenge has quite specific requirements i.e tell us what style of Tattoo Art and  about the hand drawn element.

Look forward to viewing your creations

Hugs Annie xx
post signature

Sunday, 22 June 2014

Anniversary Card

Hello friends..........I am sorry for my absence over the last few weeks but I have been on holiday in Italy, which was stunning, if a little hot !!! (over 35 degrees) I hope you are all well and, if you live in the UK, that you are enjoying the sunshine. Can I also welcome my newest followers, its so kind of you to join me here at CNCT.

Just a little  6 by 6 kraft card to share with you, using Tim Holtz Wallpaper Stash Pad and some of Tim's stamps, Idea-ology, Distress and Archival Inks as well as Eclectic Elements fabric remnants.

As always thank you so much for dropping in and leaving a kind comment. Its my plan to catch up with many of you later this afternoon/evening.

Can I also share with you that after more than two years blogging/emailing/phone calls and gifts, my mum
( Rita of RMG Creations and Redanne of bollyanne blogspot) finally met up with one another.  Having met with Anne last November I knew how keen she was to meet mum, so it was quite an emotional get together and they got on like a house on fire. I also shared a few hours with Anne and her husband and it was wonderful to catch up.


post signature

Sunday, 25 May 2014

Quick Card

Hi Everyone....................hope you are all well and a huge welcome to my new followers x Its Great to have you on board here at Curious n Crafty Treasures.
Just a quick post from me today as the kids are coming over for dinner so I must head off and get cooking !!

The card below was made using the  gorgeous Madame Payraud Papers by Papermania, which my lovely crafty friend Astrid  introduced to mammy and I in April.

One sheet of the paper, cut two strips then edge with Distress Ink in Vintage Photo. The middle section was matted on to some brown card. A piece of lace from my stash was adhered on to the matted card, then I added  a sentiment from Tim Holtz Stampers Anonymous  Simple Sayings Stamp Set. ( a really useful set)

A small flower, and a Madame Payraud Butterfly, a speckled stamp and some DI on the edge of the card and we are done........well except for the insert, which I like to personalise where possible. There are also some delightful card verses available on the internet, which you can copy and then print.

Enjoy the rest of your Sunday and I will be back on Tuesday with my Craft Room Challenge Project. xx
post signature

Tuesday, 13 May 2014

Recycle at CRC

Hi Everyone.....where did the last fortnight go? I just can't believe how fast time is going and where is the sunshine? We have had nothing but  a teasing of sunshine and showers....very heavy ones at that !!

At Craft Room Challenge this fortnight Esther has chosen the challenge theme of Recycle. I have been doing quite a lot of this recently and decided to re-purpose a tin can, which would hold some pens/tools etc.
The style is similar to my recycled cat food box and they will look lovely together on my workdesk.

Our sponsor is Ali-Craft and many of you will have seen Ali on that well known craft channel C&C TV.


So here is my DT make and the 'How To'

 I gave the can a coat of gesso but I did not have to do this as Ranger Glue n Seal adheres  to metal
 The paper is from Tim Holtz Vintage Shabby paper stash. Once again I blended Peacock Feathers Distress Ink around the edges, then defined the edge with a mix of Vintage Photo and Walnut Stain Distress Inks.
 Various Distress Inks were applied through Tim Holtz stencils - Arrows, Schoolhouse and splatters, then some Rub On's were applied
 Glue N Seal was used to adhere the paper to the tin. I left  the paper a bit longer  than the depth of the tin so that I could make a slight cut and fold  the paper  to the inside edge. Later on I applied some recycled lace to this small inner edge as it looked so much neater.
 Some Burlap was adhered round the centre of the tin. I then applied another layer of Tim Holtz Tissue tape, which was blended with Peacock feathers.
I have had the  TH Mini Paper Rosette  strip die in my stash for ages and decided that I would incorporate it on the tin. I then took some more TH  Tissue Tape to use as ribbon and then placed an Idea-Ology Time Piece on top.
 The inside of the tin was already white and you can see the lace just covers that little lip where the ring pull would sit.

I then took some of Tim's New Ephemera and stamped the Paris New York on to card, which was torn around the edges before blending Vintage Photo DI.
 Ephemera pieces and you can see the stencilling, burlap and tissue tape, rub ons etc
 I now have something to hold pencils or crafty tools and it matches a recent project, which was a recycled cat food box using all things Tim Holtz.
Now lets see what you recycle....................and for more inspiration you can view the wonderful crafty projects by my DT sisters at the CRC blog by clicking HERE

Take Care and Catch up Soon xx
post signature

Monday, 5 May 2014

Destination Inspiration at A Vintage Journey

Hello everyone.........I am so excited to be posting my very first Destination Inspiration Project at AVJ today and I hope you will join me on my creative journey.

For my project I decided to recycle and re-purpose a box, which you can see below


And here  you can see  the front of the finished project, which was decorated both inside and out.

To view the step by step please  click HERE for and  you may like to grab a cuppa as its quite photo heavy !!!

Take care and thank you for visiting. I love to read your comments and to visit you as often as I can.

Crafty Hugs xx


post signature

Friday, 2 May 2014

Fond Memories at AVJ


Hi Everyone......its Friday again and time for another new challenge at AVJ. Our challenge host is the lovely Terry, who has chosen the theme 'Fond Memories'.
You can see the details of Terry's challenge theme by clicking HERE. We are a Tim Inspired Challenge so please make sure you check out our Challenge Rules to qualify for entry  to our prize, which is sponsored by Country View Crafts.

Below you can see my DT project..........a fond memory of my Nana ( maternal grandmother) who was an inspiration to me  throughout my childhood and teenage years. She is always on my mind, but more so recently as my son has just got engaged and we are looking forward to his wedding in 2015. She would be so proud of him as he is such a fine young man.  

                                                                                   
I started out with this box, which  previously contained a candle. I decided to cover it in Tim Holtz French Industrial Papers. Once I cut the papers to size I adhered them with Ranger Multi Medium inside and out.
 Once dry I took Vintage Photo DI to distress the edges of the box and lid.
 I then took Tim's Tattered Florals Movers and Shapers Die and cut out more of the FI papers, inking them with Vintage Photo Distress Ink. I so love these Roses :-) ( Tutorials for the Roses can be found on You Tube)
Some Vintage lace was adhered with Ranger Wonder Tape and pearls added with Ranger Glossy Accents
 I scanned my Nana's photograph and adhered it to a die cut frame, decorated with a rusty heart, button and Tim's chit chat sticker. More lace and a little butterfly cut from some lovely ribbon from my craft friend Anita H. ( Thank You Anita)
The Photo Frame was coloured using Tim's Distress Markers  ( Shabby Shutters and Barn Door) and Vintage Photo DI.

 More lace ribbons and buttons were applied to complete the look as well as some twine and a small tag.


 I hope you like my Fond Memory and if there's anything you want to know just email me using the button on my sidebar x
For more inspiration you can pop over to AVJ blog and view the fabulous projects created by my DT sisters.
Looking forward to viewing your entries but most of all have fun.

Huge hugs xx
post signature