Showing posts with label A Vintage Journey. Show all posts

Friday, 22 February 2019

Creative Card Making Post over at A Vintage Journey Challenge Blog

Hi everyone and a huge warm welcome to my new followers x It's always lovely to have you visit and leave a comment, enabling me to get back to you x 
Today I am sharing a Creative Card Making Post over at A Vintage Journey. To view the step by step details please click HERE

Below is a little sneaky peek of my 8x8 inch card:
At this point I was considering what my final layout would look like (by shuffling everything around) and of any additional embellishments I could incorporate x

Crafty Hugs & Best Wishes

post signature

Monday, 21 August 2017

Sneaky Peek !!

Hi everyone xx Today I am sharing a Destination Inspiration post over at A Vintage Journey and below is a sneaky peek to tempt you to visit xxx
I really enjoyed playing with the contents of this month's travel bag and I can see me making many more of these lovely home decor pieces.
To view the whole post please click HERE

Thank You so much for dropping in.....your visits are truly appreciated x

Happy Crafting xx

post signature

Monday, 24 October 2016

Destination Inspiration at A Vintage Journey

Welcome lovely peeps xx Today I am sharing a project over at A Vintage Journey Blog, which is part of the Destination Inspiration. Creative Guides share step by step details of creations using certain products, techniques, colours and substrates from our Travel Bag

Below is a sneak peek of my make :


To view the complete project and step by step please click HERE

Thank You for dropping in today and if you leave me a comment I shall get back to you as soon as I can

Take care and happy crafting xxxx

post signature

Friday, 14 March 2014

Tag Friday @ AVJ

Hi Everyone.......Hope you have had a great week and are looking forward to the weekend.................Today is 'Tag Friday' at A Vintage Journey ( AVJ) blog. As last Friday was the launch of our very first fornightly challenge theme we decided to have a Tag Friday post. In future this will be our  Challenge Winner's post. My lovely DT sisters have created some fabulous tags/techniques to share with you so do drop by ..............it's definitely worthwhile x 

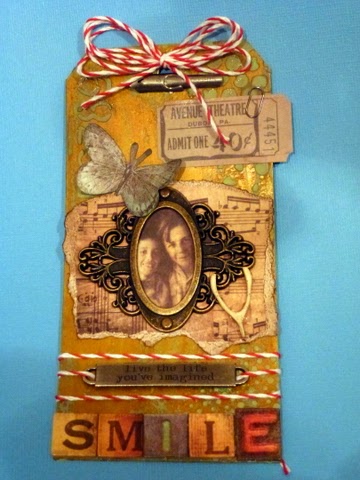
Below is my project, using a Ranger Inkessentials size 8 Manila Tag. 
 I received  my copy of Tim Holtz Compendium of Curiosities  Volume 3 a couple of weeks ago. It is totally amazing, with lots of wonderful  ideas, techniques, products and a gallery of inspiration. 
On page 44 of the CC3 book you will find Tim's Eroded Metallic technique, which I decided to try. You will find that Tim has provided photographs and step by step instructions for you to follow, with details of products required. 
This technique is amazing and I apologise for the photograph, which I took in my craft room. The artificial light does not do this background justice.
As usual, I  was not sure where I was going with my tag but decided to colour some textured paste with Distress Paint, mixing it thoroughly before applying through Tim Holtz Bubble, School House and Dot Fade Stencils. ( it's not the best photograph  :-(  but you get the idea :-)

 I decided  that the Mowed Lawn Distress Paint required to be a bit more vintage in its appearance, so I applied some Walnut Stain Distress Ink over the stencilled areas and obtained the look I was after.  
To embellish I tore some TH Paper, applied Distress Ink to age it and then adhered some metal Idea-ology pieces, some of the New TH Ephemera and Alpha Tiles. 

There is still time to enter our 'Anything Tim' Challenge over at A Vintage Journey blog so check out the Travelling Instructions and then have fun. The winner is chosen by the DT and receives a £10 gift voucher from our regular sponsor Country View Crafts.....looking forward to viewing your project there x

CRafty Hugs
post signature

Friday, 7 March 2014

Anything Tim @ A Vintage Journey

Hi Everyone........today sees the launch of our first challenge at A Vintage Journey challenge blog, which is 'Anything Tim'.  You can view the blog and more challenge details by clicking HERE
We are all quite excited and hope you will join in with us on this amazing journey.......................my  fabulous DT roomies have created some wonderful inspiring projects, so do pop over and take a  closer look
I  created a 12 by 12 project using  a variety of Tim Holtz products, which includes Tissue Tape, TH Sizzix dies, Chit Chat Stickers, Adage Tickets, Distress Inks, Idea-Ology pieces, stencils as well as some of Tim's NEW Ephemera pieces.
Our sponsor is Country View Crafts, where you will find a fantastic range of Tim Holtz products with Free P&P


To start with I recycled  a piece of the 12 by 12 leather look cardboard packaging that was used to protect my personalised copy of Tim's new book, Compendium of Curiosities 111. ( It's so amazing with lots of techniques and inspiration................just love it!!!) The cardboard edge was inked with Distress Inks to cover the white edge.  I also used some of Tim's Paper Stash, which I distressed with Vintage Photo and Walnut Stain DI's. The edges were torn/distressed using Tim's Tonic Studios Paper Distresser.  I  then used Walnut Stain Distress Stains to create the 'Splats'
  The splatted papers  were matted on to some more of Tim's papers, which were aged with Distress Inks, namely Walnut Stain, some stitching was completed on one side  of each piece and a layer of burlap placed under the paper layers top left. Tissue Tape and a TH Sizzix  On the Edge Die completed the initial background as seen below.
 I then began to create the page layout, taking some personal photographs, matted on to brown cardstock. The  white edges of the photographs were inked with Vintage Photo DI.  We had some personal  memorabillia from the Second World War, which I scanned and then printed. The copies were scrunched and torn then aged with various Distress Inks, namely Stormy Sky, Vintage Photo, Rusty Hinge and Walnut Stain. You can see below how I just began to lay out the pieces without adhering them. I then cut out some pediments, using Tim's Sizzix Die.  These were placed at the top of the photographs. Idea-Ology pieces and  some of Tim's New Ephemera really brought this piece together. ( Idea-ology pieces and the key were adhered with Glossy Accents and TH brads)
 You can see a close up of the items and a clearer view of the stencilling, using Tim's Faded Dots, Bubble and Schoolhouse stencils.I loved the Palace Theatre ticket you can see as there is a theatre of the same name about 9 miles away, though the cost would have been in shillings at that time, not cents.....but hey its all about imagination !!
 I adore the New Alpha Tiles that Tim has released and they  really draw the eye to the pediment die and photograph.
 The key  you can see below was obtained from a well known auction site and I love the chunkiness of it. Talbot House was a B&B in Grimsby and my FIL must have stayed there  when on a pass/leave and for some reason kept the receipt. So glad he did !!
 Thank You so much for dropping in.......it really does mean so much to me and I love to read your comments, which also enable me to get back to you.
We look forward to viewing your entries and hope that you have found some inspiration.
Have fun and Crafty Hugs xx